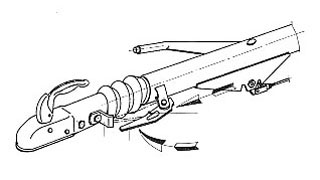
| COUPLING AND UNCOUPLING OF THE ERIBA
The various trailer models, depending on their size and weight category,
become equiped with different tow coupling types.
The coupling and uncoupling operations are considerably facilitated
with the aid of the towbar supporting wheel.
Please make sure that the inside of the coupling is not dirty, and that
the movable parts of the coupling are well greased.
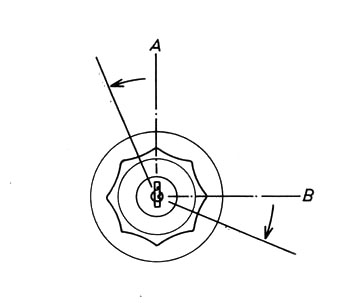
Coupling : During the coupling operation and due to the pressure of
the ball end being exerted upon the ball cup, an eccentric lever is
released. The operating lever spring presses the lever into the safety
position. At the same time the additional safety mechanism will become
locked in place. Any unintentional opening is thereby effectively
prevented.
Uncoupling : Press with thumb onto the release lever and pull up the
handle toward the front.
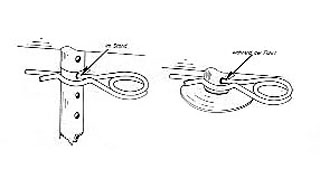
The cable rope : must be attached to the towing motor vehicle with
the loop and respectively with the spring safety hook..
Reverse drive : The reverse drive catch mechanism is actuated for
the purpose of driving in reverse with the trailer hitched up and when the
overrunning brake is therefore temporarilly put out of service.
This catch operates semi-automatically , when the brake is in the
released position, the catch must be engaged by hand before baching up but
will become disengaged automatically following the change back to forward
driving.
Press the locking bar inwardly and slide it forwardly until the nose locks
in and engages in the stop bracked.
BEFORE EACH START The
towbar wheel is to be completely pulled up before the start. The roller
must always be positioned paralell to the driving direction.
The seven-pole plug is plugged into the socked of the towing car and
protected from fallling out by the folded-down protective cover.
The connecting cable must be placed in a loose loop but shoud not trail on
the ground.
Before each start, check whether the coupling operation has been properly
carried out and executed. Make sure that the coupling mouth and the ball
engage and interlock are not just loosly placed on top of each other. The
coupling mouth must completely enclose the ball.
The cable rope must be attached to the towing motor vehicle with the loop
and respectively with the spring safety hood.
Before starting out on any trip make sure that all of the supports are
cranked up.
After the first trip tighten the wheel nuts and check tehm periodically
thereafter to be sure they still are positoned tightly.
SETTING UP THE CARAVAN The 4
corner supports or posts serve for setting up the caravan and support the
chassis of the caravan. You must understand that when the caravan is
loaded and when you uncouple the caravan and go inside the caravan and the
weight of the owners comes along with the total weight , the caravan is
overloaded and the chassis can not hold this weight , so you have to
support the caravan. Therefor use the 4 corner supports.
SETTING UP THE CARAVAN ON UNEVEN
GROUND The towbar wheel should be used to aid in this
operation.
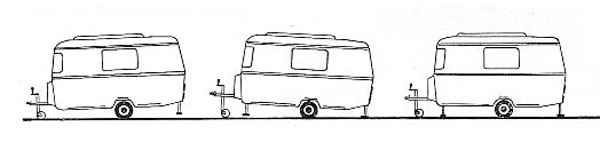
In case of a forwardly-inclined position of the caravan , crank out
the rear supports first.
Raise the caravan in front with the aid of the towbar wheel
and crank out the front supports.
Ajust the position of
the supports until the horizontal position of the caravan has been
achieved and relieve the towbar wheel.
The cranked supports may have to be readjusted several times. It is
recommanded that wooden shims be used as a base.
CHANGING WHEELS
In proximity to the wheel there is a u-shapped profile at a crossbar
of the undercarriage which is designed for receiving a conventional
motor vehicle jack. If there is no u-shapped profile the jack should be
placed under a crossbar but never under the wooden floor. The 4 corner
supports serve for setting up the caravan but should not be used as
jacks.
De bijgeleverde hoeksteun draai sleutel mag nooit gebruikt worden
voor het vast draaien van de wielbouten, deze is hier niet op berekend.
Gebruik een auto wiel sleutel.
LOADING THE CARAVAN Loading can
be undertaken in accordance with the difference between the net weight if
the caravan and the admissible total weight. Any overloading is
inadmissible and must be avoided. Load the caravan in such a manner that
the towbar is weighted with approximately 40 to 50 kg.
The heaviest objects should be placed near the axle so as to constitute a
weight concentration in the center of the caravan. Never load the tail
heavy.
Improperly loaded
: Two separate weight centers result in a tendency to
produce swinging or skidding.
Properly loaded
: The weight concentration must be placed near the axle.
Heavy objects like awning, canned goods, etc should not be stored in the
rear of the caravan.
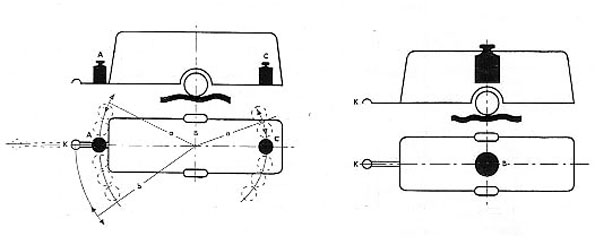
WRONG
RIGHT
VENTILATION OF THE CARAVAN
Ventilation in the caravan is so important that we invite your special
attention to this subject.
Consider the few cubic meters of air which such a caravan encloces. The
windows and door are equipped with rubber seals. When they are closed,
there are hardly any crevices through which fresh air could come into the
caravan ftom the outside. On the other hand you rightfully expect a
pleasant atmosphere inside the caravan. The oxygen consumption of man is quite considerable. A burning gas lamp or
gas burner used for cooking additionally use up the oxygen supply in the
caravan. This is why you must ventilate, ragardless of weather conditions, both in
summer and in winter. Therefor, make sure
you have a constant exchange of air by judiciously vertilating your
caravan. Only in this manner can you control also the problem of
condensastion in cooler weather. You can indeed have comfortable climatic
conditions in your caravan at all times in the cool seasons and for
camping in winter with a well coordinated use of heating, ventilating and
airing.
OPERATION OF THE ROOF Open :
Loosen locking knobs and push the roof hood upwerdly with one hand.
Close : Pull down the roof hood and tighten the knobs in the desired
position.
To make the colsing of the big roof hoods (triton,troll) easier, first
pull the front of the roof hood and afterwards pull the back of the roof
hood down.
De gasveren mogen echter geen geweld worden aangedaan.
OPERATION OF THE WINDOWS
Open : Unlock window locks. Push window uotwardly. When the desired
posotion is reached, tighten the knobs of the clamping devices.
Close: To reclose, loosen the knobs until no clamping effect is
present any more, then pull window shut at the locks. Window for night
time operation : Disposed at the laterally extending window arms are
locking levers by means of which the window can be brought into two
different positions.
A position with a gap for ventilation purpose or a tightly closed position.
Window with automatic locking mechanism : in this case, the materally
extending arms are automatically locked in different positions when the
windows are folded uotwardly. As soon as the window is raised a further
distance, the locking mechanisms become released and the window van be
folded back into the closing position thereof.
OPERATION OF OUTSIDE DOOR LOCK
To open : Insert key and turn to the right up to the
limit stop (b). Door can be opened by puling out handle.
To lock : Push door shut. Turn key towar the left up
to the limit stop (a). Key can be removed when it is again in the starting
position.
POSITIONING OF THE TABLE The
table is supperted and held in a displaceable rail. In the horizontal
position the table will jam. For purposes of lateral displacement, the
table plate or top must be slightly raised. When the table is in the
diagonally upwardy folded position, it can be removed from and
respectively palced into the rail. The leg of the table take or fold away.
To fold away the leg of the table, press its tube stsay inwardly at the
toop and after folding allow to snap into the other holding position.
Make sure that the leg of the table is always folded out when you put the
table into the rail.
CONVERSION FOR SLEEPING By
putting on the back bolster a closed sleeping surface is obteined.
In so called longitudinal bed seating groups it is necessasry to use
an extension leaf in addition to the table, it comes loosely and must be
inserted ( following the table top ) between the lateral walls of the bed
boxes. To do so, slightly lift the folding lids of the bed boxes.
For round seating groups with a free standing table
in the center : To make up and provide for the sleeping surface, totally depress and crank
down the table.
There are 2 different systems.
Round seating groups with a table stand being rigidly secured to the floor
:
In this case, raleasr the locking lever below the table top by laterally
turning it aside, press table top downwardly, retghten the locking lever.
Round seating groups with a movably positioned crank type table
: In order to insure that this type of table will not slide about during the trip, it
is recommended that it will be totally cranked down and that the back
bolsters or pillows be placed on it.
THE GAS APPLIANCES
The appliances as installated are disigned for the operation with
propane gas. ( if butane gas id intended to be used, a special
adjustment is necessary )
The gas regulator as well as the appliances which have been installated
are set for an operating pressure of 500 mm.
When the cooker or other gas appliances are not in use, the check valve
of the fas bottle must be closed.
When several gas appliances are provided for a separate additional check
valve is required for each tapping point and must be closed when
respektive appliance is not in use.
When open burners ( cooking appliance, gas lamp ) are operated, the door
and roof ventilation must be open.
The propane cooker must not be used for heating purposes.
STARTING THE COOKING APPLIANCE
After opening the main shut off valves ( valve of gas bottle if present )
push in stopcock of the desired burner and turn dial to the open position,
light gas flame at burner at the same time. Continue to press in the
stopcock for a few seconds until the ignition sasfety valve keeps the gas
supply open by itself.
When the flame is extinguished, the ignition safety valve will
automatically shut off the gas supply.
For
additional gas appliences, the attached operating instructions should be
corsidered.
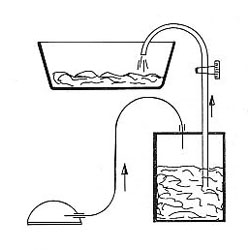
THE WATER SUPPLY Manual pump :
With the aid of pneumatic pressure installation, excess pressure is
prodeced in the water tank by means of the pump and will escape when the
faucets are opened in the from water flowing out.
Starting : remove the carrying container from the support and fill with
water. In place of the closing nut, insert the rubber stopper together
wiht the supply hose in the neck of the container and tighten srew
cap. When water is needed, pump pressure into tank.
Electric pump : the electric pump can never run dry meaning never
running without water.
The electric pump is working with 2 batteries of 6 volt each.
THE ELECTRICAL SYSTEM The
electrical system comprises 2 different circuits, one fo rpower current (
up to 220 v ) and one for week current ( 6v , 12v ) It should be
noted that the bulbs being used in connection with these circuits must be
adapted to the respective voltage.
Power current : The sockets provided in the laterel walls of the bed
boxes are protected by O-conductors at the tubular steel frame of the
superstructure. Suitable as supply cable is the cable type NYMHY 3x1,5
mm2 , or a corresponding rubber cable. The protective contact, plug and
coupling should be waterprooved and made of unbreakable material.
Week current : the connection with the towing motor vehicle is
established with the aid of a seven-pole plug. Inside lighting : the supply with week current may be regulated
selectively either from the towing motor vehicle or also from an
additional battery adapted to be connected to the box onthe left. A
throw-over switch in the lateral wall of the left bed box serves for
this purpose.The double inside lamps are connected to the week current line with one
bulb, and with the other to the power circuit.
*throw-over switch from 12volt to 220volt
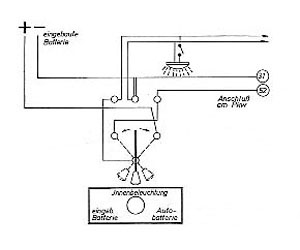
*220 volt power current 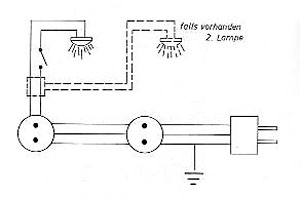
*7-pole plug
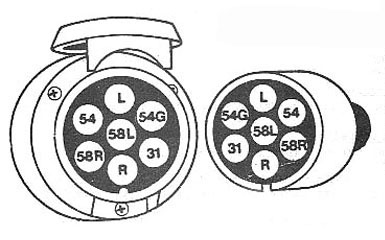 |
| L |
= |
left blinker |
| 54G |
= |
inside lights--constant power |
| 31 |
= |
mass |
| R |
= |
right blinker |
| 58R |
= |
right backlight + front licht and numberplate light |
| 54 |
= |
brake lights |
| 58L |
= |
left back light + front light |
|
CARE : CLEANING OF THE CARAVAN *
Care of the exterior : Wash often with plenty of water. Tar stains and
dead insects should be removed promptly. Avoid anything which might
produce scratches and riffles on the finished surface. Accordingly, do not
handle with a brush, hard cloth, coarse absorbent cotton, or unsuitable
detergents. It is suggested that the extertior finish and, respectively,
the outer polyester skin, be periodically treated with a good approprirate
aid ( car polish or wax )
*Windows of acrylic glass : They require particulary careful
treatment and care because of their sensitiveness. Never dry wipe. Always
wash with clran sponge and soft cloth, use as much water as possible.
*Care of the undercarriage : Once every year you should also take a
look under the caravan. If any rust has formed, the tubular steel base
can use a new coat. A suitable varnish on a synthetic resin base or a
bitumen coating may be used for this purpose. Any traces of rust should
previously be treated with a rust preventive.
*Care of the interior cleaning : Use any of the conventional
household cleaning aids.
*Sink : If possible, never clean sink with a sand containing arsh
scouring powder. Avoid, if possoble anything that can cause scratches
and riffles.
*Furniture : In case is dust, use moist woolen cloth. Varnished
surfaces may also be treated with furniture polish.
*Upholstery : If necessary clean carefully with the lather of a mild
detergent ( or also , dry form )
*Floors : Like all pvc flooring, the floor demands little and only
uncomplicated care, wet cleaning only if necessary.
LITTLE DISTURBANCE ...................
*The coupling does not lock in after attachment : safety head has not
engaged. Messure the ball, it must not be larger than 50 mm in diameter.
The inside parts of the coupling may be dirty and therefore no longer
operate automatically. Clean thoroughly and thereafter by all means
lubricate carefully.
*Caravan can not be uncoupled : cause ball is out round. Remedy
bring the caravan and the car in the same direction, then uncouple (
exchange out of round ball as soon as possible )
*Tow coupling heasd or ball : The coupling head or ball at the car
should have a max diameter of 50 mm and a min diameter of 49,5 mm
according to - din74058- If the diameter of the head or ball
should drop below 48,5 mm , it must replaced . The ball must not be out
of round.
*Poor braking results : The brake system was not adjusted. The hose
cable has not been lubricated ( or it may be broken or bent ) The
overrunning device has not been lubricated. The wheel brakes may be full
of oil. The brake linings are worn.
*Brake pulls on one side : Wheel brakes were unevenly adjusted. One
hose cable was not lubricated, or is broken or bent. Remedy remove brake
drums and check wheel brakes.
*Jerky braking and driving : The tie rod is being pushed in too far.
Adjust wheel brakes.
*Caravan brakes unintentionally, already when one takes foot off
accelerator : Adjust wheel brakes. If the tie rod can be mooved to and
from by hand without any resistance, it is necessary to chesk the chock
absorbers. It might be broken and it must be replaced.
*The lightning system no longer operates fully : example one blinker
light does not work. Possible causes. Bulb may be burned out
( unscrew housing cover of light , exchange bulb and be sure of correct
volt and watt specifications ) Contacts at the 7-pole plug and socket
may be oxidized or dirty ( clean and polish ) Short circuit due to water
contained in plug or socket (open and dry ) Interruption at cable (
check first at 7-pole plug, take apart housing, if necessary connect a
new )
*Defective gas plant : recognizable because of gas smell , high gas
consumption. Remedy immediately put plant out of operation. Close bottle
valve. Open windows and door and air thoroughly. Than repaire the
problem.
*Defects on gas burner : Ignition safety means do not respond (
flame does not continue to burn after stopchock dials are no longer
depressed ) Flame goes out when dial turned to low ( check whether the
ignition safety means are in the correct position. The feeler tip should
be higher be 5 mm than the burner. The feeler neck must not be farther
removed from burner tahn 3 mm )
*Defects on refrigerator or heater : Inform the nearest customer
service representative of the respective appliance manufacturer.
*Defect in water supply : Find leak. Clamp a new supply hose. Check
whether rubber stopper is tightly in place in the neck of the tank.
Check whether the supply hose could possibly be bent off. *Defects
at tilted wing push out window : Window pane has loosefot and seating (precisely
center window in frame and tighten cap screws of the clamping screws at
the hinge plates ) Window locks have loose seating ( tighten nuts of the
fastening screws ) Window does not stay in the open position despite teh
tightening of the clamp screws at the fixtures ( completely take out clamp
screws, use a shim plate, possibly also shorten threaded journal, grease
thread and very tightly put clamp screws in place again )
*Lifting roof hard to operate : grease scissor type hardware and
respectively in the case of the cranck type lifting roof, the worm gear
spindle.
WITH PROBLEMS ABOUT REPARATIONS OF BROKEN PARSTS OR QUESTIONS OF
YOUR ERIBA DO NOT HASITATE TO GET IN TOUCH WITH US BY CONTACT ON THIS
WEBSITE |